Update your Aadhaar Card
After receiving your Aadhaar Card, if you discover a typo or mistake in your name, email address, house address, etc, it means you have to get the details corrected on the Aadhaar database. You can get a mistake rectified using the Aadhaar enrolment or correction form. Standard charges apply for Aadhaar updates. If you request for changes or corrections after enrolment but within the first 4 days, then no charges apply. The charges are up to Rs. 50 including taxes for correction or updates requested after the 4-day window period.
Below, we have discussed an example of Aadhaar correction/update:
- You can make corrections and updates in your Aadhaar Card through online mode.
NOTE: A few corrections however can be done only offline at the Aadhaar Seva Kendra. This is in the case of mobile number update if your registered mobile number is not with you.
- You can make changes to your address online. For this, you have to login to the uidai self-service portal with your virtual id (vid) or aadhaar number.
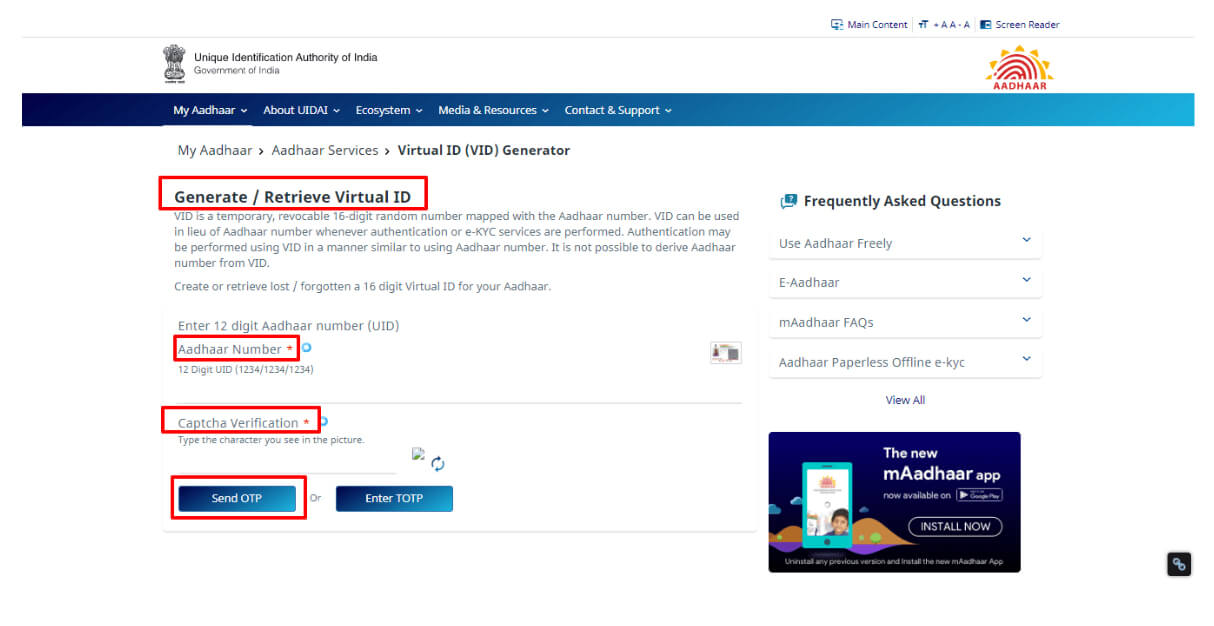
- VID is a 16-digit number. This is temporarily provided for your Aadhaar to facilitate e-KYC or authentication.
NOTE: Make sure that your mobile number is updated with the Aadhaar card for making any online corrections/updates.
- A VID allows you to complete the procedure without having to disclose your Aadhaar number. It is possible to generate a VID on the portal of UIDAI.
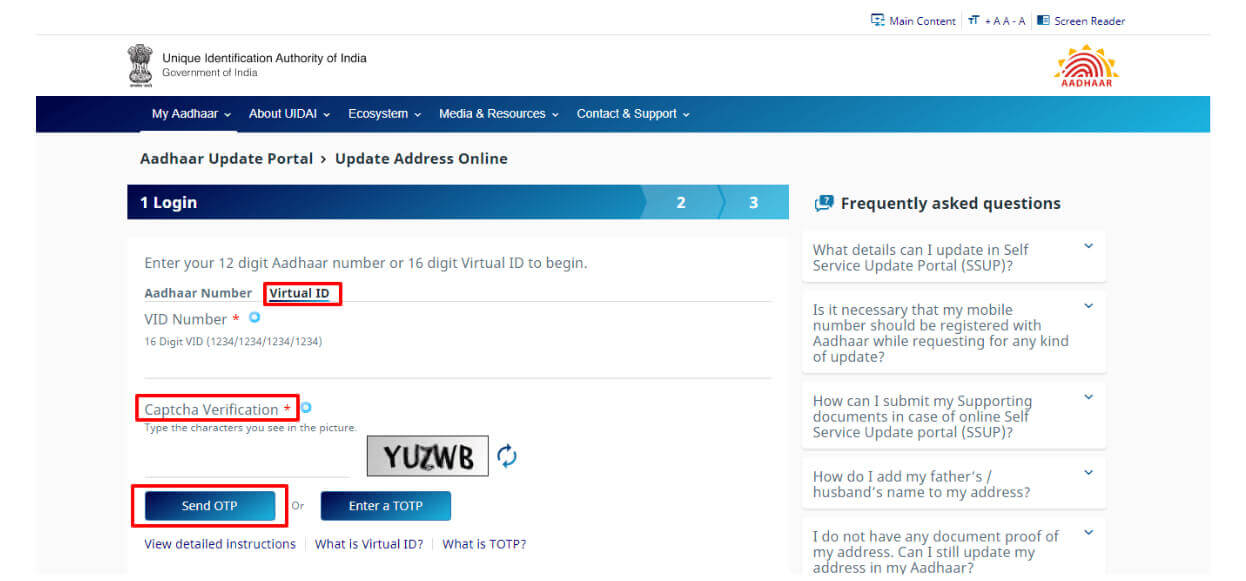
- After completion of the Captcha verification, click ‘send OTP’. Now enter the OTP you received on your mobile number. Click ‘Login’.
- You can select from any of the two given choices:
- Update Address via Address Proof
- Update Address via Secret Code (if you have the Address Validation Letter)
If you go with the option ‘Update Address via Address Proof’, then you will get to see the current registered address.
- Now, there will be an option to enter your new address. After entering the new address, click ‘Preview’.
- You can ‘Edit’ the details or ‘Submit’ after ticking off the consent statement.
- You need to scan the original copy of the proof of address, and upload here.
After the submission of request, you will get an URN (Update Request Number). Using the URN, you can track the correction/change status of your Aadhaar Card. This can be done online on the Aadhaar portal.
Steps for Offline Submission of the Aadhaar Correction Form
You can submit the correction/update form offline at an Aadhaar enrolment/update centre. Follow the steps for the same as mentioned below:
- Visit the nearest enrolment centre. Here, you will get the correction form. Now fill up the form.
- You can even download the Aadhaar correction form online and then go to the update centre.
- Carry all the relevant documents for verification against the changes/corrections you wish to request.
- Submit the form and documents for verification to the operator at the enrolment centre.
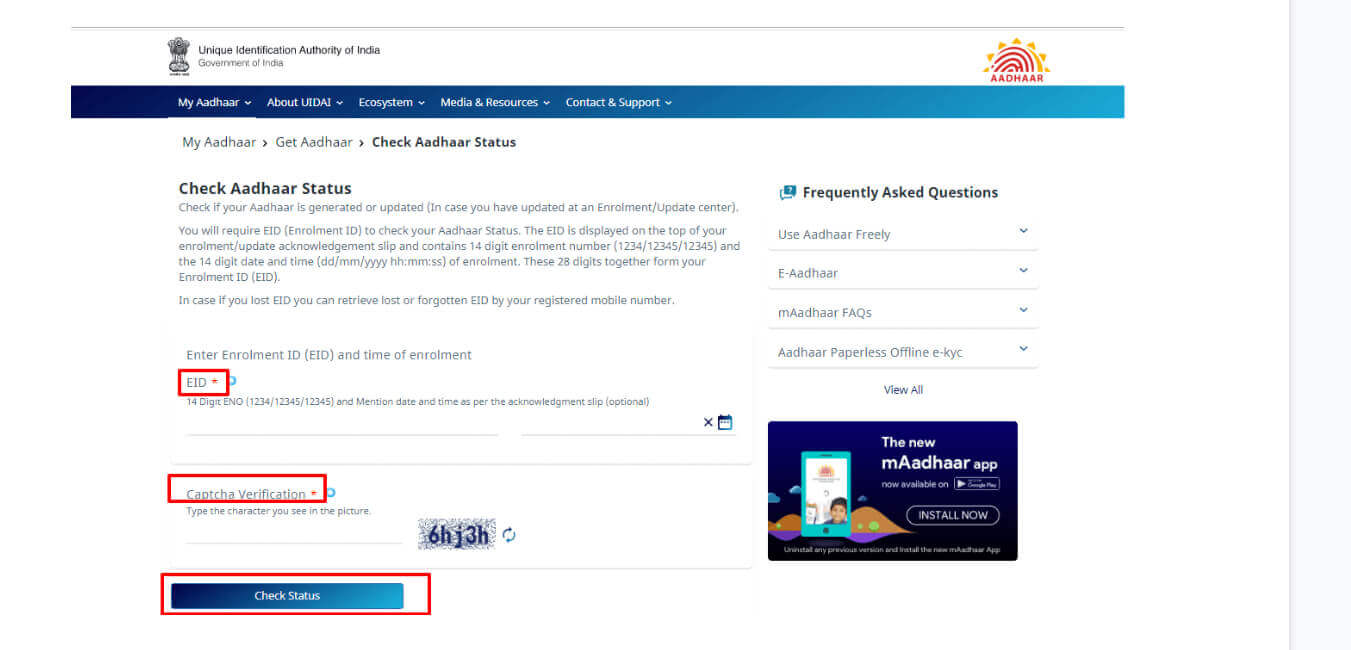
- After submitting the form, on the UIDAI self-service portal, you can check the aadhaar update status of requested changes.
- nt ID, do the captcha verification, and select ‘Check Status’.
How to Fill the Aadhaar Correction Form?
You will get the Aadhaar correction form at an enrolment or update centre. Or, you can download aadhaar correction form online in the PDF format at the UIDAI website. The form for enrolment and correction are one and the same. Thus, in order to not get confused and fill only the necessary details in regards with corrections follow the below-mentioned suggestions:
- Write down your name.
- Provide your 28-digit EID (enrolment ID). The ID contains the enrolment number, the date and time stamp.
- Enter information only in the fields related to the information you want to get corrected.
- Details of how to fill the correction/enrolment form is on page 2 of the PDF document.
What Are the Different Fields in the Aadhaar Correction Form?
Below-given is a brief description about the meaning of each field in the Aadhaar correction/enrolment form. We will also discuss what type of information to enter in each of the fields.
- Name: You have to enter your full name here as per your legal document, especially that on your PAN Card, passport, driving license, etc. you have to provide a valid proof of identity to substantiate your name.
- Age or Date of Birth (DoB): You have to follow DD/MM/YYYY format to enter your date of birth. For instance, you were born on 12th January, 1990. Then you have to enter DoB as 12 01 1990. If you do not know the exact date of birth, then you may enter the estimated age in years. If you do not have proof of DoB, then in the documentary evidence, tick against ‘Declared’. If you have the proof of DoB, then tick against ‘Verified’.
- Gender: You have to specify your gender – Female, Male, or Transgender.
- Address: Enter your complete address. This has to be substantiated with the original proof of address. The staff at the enrolment centre will do the verification. Remember to enter the correct address as the Aadhaar Card will arrive at the said address. If you make errors in the address information, then you may not receive the document. In this section, you also have to provide your email address and mobile number, which will get registered in your Aadhaar database.
- Relationship: If there is a need for an Aadhaar Card for a child, who is younger than 5 years old, then the Aadhaar number and name of father/mother/guardian is compulsory to be provided in the form. This section is not required for adults who wish to apply for the document.
- Documents: You have to mention the documents that you will provide as proof of address, proof of identity, proof of date of birth, and proof of relationship (if any).
- Introducer/Head of Family (HoF): If you lack proof of address or identity, then for verification purposes, the Head of the Family or an Introducer allotted at the Aadhaar Seva Kendra must submit his/her EID or Aadhaar as proof.